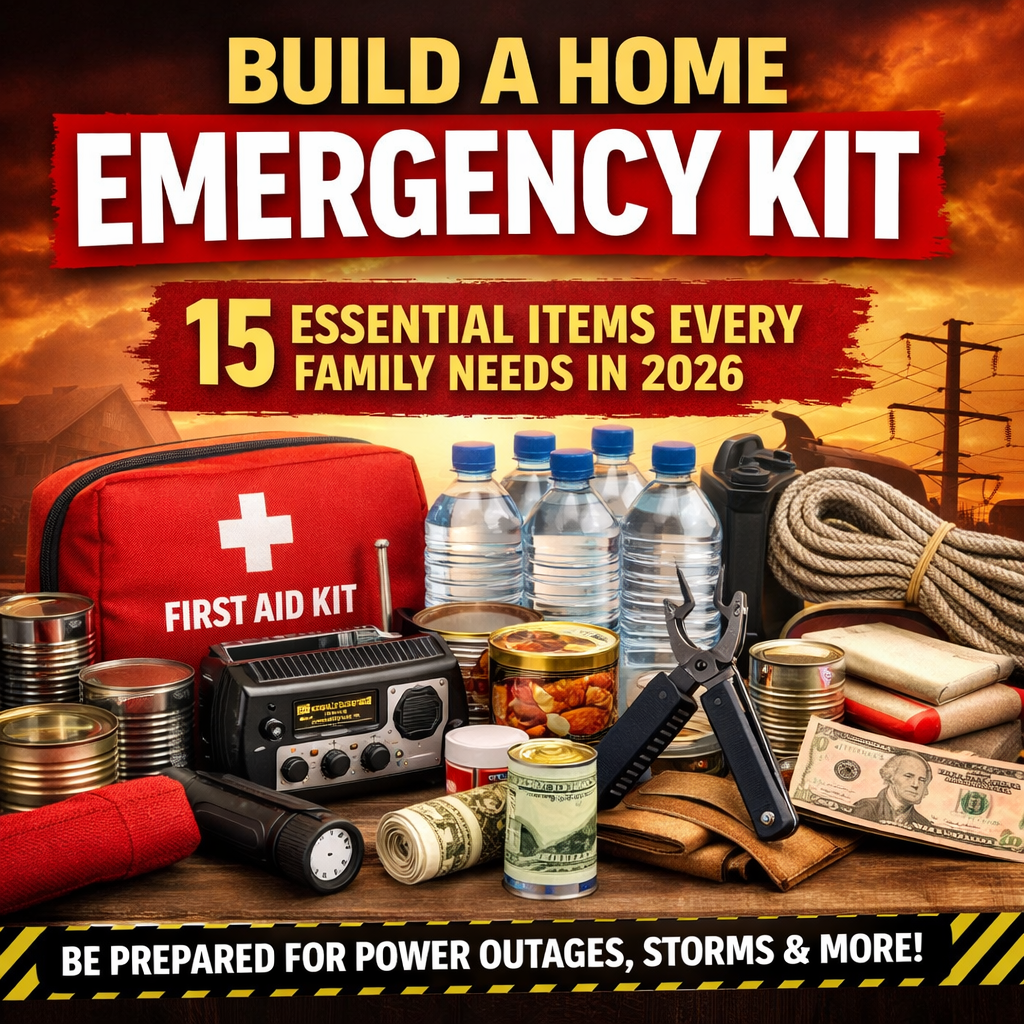
A home emergency kit is one of the most important things a family can prepare before a storm, power outage, or unexpected emergency. A home emergency kit should include basic supplies like water, food, lighting, first aid supplies, and important documents so your household can function if stores are closed or electricity is out.
A car emergency kit is one of those things people usually plan to put together “someday,” but someday often turns into the day you are already stranded on the side of the road. A flat tire, dead battery, sudden road closure, bad weather, overheating, or sitting in traffic for hours can turn a normal drive into a stressful situation very quickly.
The good news is that building a car emergency kit does not have to be expensive or complicated. You do not need a giant survival setup or a trunk full of gear. What you need is a practical kit that matches the way you actually drive. Someone who commutes daily, someone who drives with children, and someone who takes road trips or camping trips may all need slightly different supplies.
This guide explains how to build a car emergency kit in a practical way, what to include first, what people often forget, and how to make sure the kit stays useful all year long.
A home emergency kit helps families stay safe and organized during power outages, storms, and other unexpected situations.
Start With the Situations You Are Most Likely to Face
Before buying random supplies, it helps to think about the real situations your car emergency kit is meant to cover. Most drivers are not preparing for a movie-style survival scenario. They are preparing for ordinary problems that become emergencies because they happen at the wrong time.
For example, you may need your kit if:
- your battery dies in a parking lot,
- you get a flat tire on a busy road,
- your car breaks down at night,
- you are stuck in traffic for hours during severe weather,
- your phone battery dies when you need directions or help,
- you are traveling with kids or pets and get delayed,
- you slide off the road in winter or get stranded in extreme heat.
When you look at it that way, building a car emergency kit becomes much easier. You are not just throwing items into a bin. You are preparing for real problems that drivers face all the time.
How to Build a Home Emergency Kit Step by Step
The easiest way to build a trustworthy car emergency kit is to think in layers. Start with the most important layer first, then add to it over time.
Layer 1: Stay Visible and Stay Safe
The first priority in any roadside emergency is safety. If your car is disabled, especially at night or in bad weather, you want other drivers to see you clearly.
That is why the first part of your kit should focus on visibility and personal safety. A reflective warning triangle, flashlight, reflective vest, and emergency lights or flares matter because they help reduce the chance of another accident while you are waiting for help or checking your vehicle.
A basic first aid kit also belongs in this first layer. It may not fix the car, but it can help if you have a cut, scrape, or minor injury while dealing with the situation. A seatbelt cutter and window breaker tool is another smart addition because it is small, inexpensive, and useful in a true emergency.
The point of this layer is simple: before you worry about fixing anything, make sure you can protect yourself.
Layer 2: Handle Common Car Problems
Once safety is covered, the next part of the kit should help with the most common vehicle problems. This is where many lists go wrong. They throw out a pile of tools without explaining what they are actually for.
Jumper cables or a portable jump starter are important because dead batteries are one of the most common reasons people get stranded. A portable tire inflator and tire pressure gauge are useful because many tire problems start slowly. Sometimes a tire is not fully flat, but it is low enough to become dangerous if ignored.
A small tool kit, work gloves, duct tape, and zip ties are not meant to turn you into a mechanic. They are there to help with simple situations, like tightening something loose, securing a temporary fix, or protecting your hands while checking under the hood.
If you live in an area with winter weather, a small shovel and ice scraper become much more important. If you travel in remote areas, a portable jump starter may be better than cables because it does not require another vehicle.
This part of the kit should match your real driving conditions, not just a generic checklist.
Layer 3: Prepare for Delays, Waiting, and Discomfort
One of the most overlooked parts of a car emergency kit is comfort. People think “emergency” and focus only on tools, but many real roadside problems involve long waits. You may be waiting for a tow truck, sitting in stopped traffic, or stuck somewhere with poor cell service.
This is where water, shelf-stable snacks, a blanket, extra clothing, and weather-related items become important. If you are delayed for several hours, these items matter a lot more than people think.
A bottle of water and a few non-perishable snacks can make a huge difference if you are stranded or unexpectedly stuck. A blanket, gloves, hat, or rain poncho can also turn a miserable situation into something manageable.
In summer, a cooling towel and extra water matter more. In winter, blankets, hand warmers, gloves, and extra socks become much more important.
This layer is about reducing stress and helping you stay calm, comfortable, and functional while you wait.
What to Put in a Home Emergency Kit
Once you understand the layers, the checklist makes more sense. These are the items most drivers should consider keeping in their vehicle.
Safety and visibility
- Reflective warning triangle
- Flashlight
- Extra batteries
- First aid kit
- Reflective vest
- Road flares or LED emergency lights
- Seatbelt cutter/window breaker
- Whistle
Basic vehicle help
- Jumper cables or portable jump starter
- Tire pressure gauge
- Portable tire inflator
- Basic tool kit
- Work gloves
- Duct tape
- Zip ties
Food, water, and comfort
- Bottled water
- Protein bars or granola bars
- Blanket
- Extra jacket or sweatshirt
- Hat and gloves
- Rain poncho
- Extra socks
- Hand warmers or cooling towel depending on season
Practical extras people forget
- Phone charger
- Portable battery pack
- Notepad and pen
- Emergency contact list
- Small cash
- Paper towels
- Baby wipes
- Hand sanitizer
- Trash bags
- Toilet paper
The list matters, but the explanation matters more. Each item should have a purpose, not just take up space.
Where to Store a Home Emergency Kit
A car emergency kit is only helpful if you can find it quickly and keep it organized. A loose pile of supplies rolling around in the trunk is not a good system.
A plastic storage bin, trunk organizer, backpack, or duffel bag all work well. The best choice is the one you will actually keep organized. A clear bin helps you see what is inside. A soft bag may be easier to fit in a smaller car. A trunk organizer works well if you want to separate tools, food, and seasonal gear.
Try to keep the most important items easy to reach. Your flashlight, reflective items, and first aid kit should not be buried under random supplies.
Good storage makes the kit feel usable instead of forgotten.
Adjust the Kit for Your Real Life
This is where the post becomes trustworthy, because not every driver needs the exact same kit.
If you drive with children, include small snacks, wipes, extra clothes, a small toy, and anything that helps during delays.
If you travel with pets, include a leash, collapsible bowl, pet food, waste bags, and any medication your pet may need.
If you commute long distances, focus more on tools, chargers, water, and visibility supplies.
If you camp, travel, or drive in rural areas, your car emergency kit should be a little stronger than someone who only drives short distances in town.
If you live where winters are harsh, cold-weather supplies matter more. If you live in a very hot area, water and heat-related items become more important.
A trustworthy kit is built for your reality, not for a generic internet checklist.
Check and Update the Kit Regularly
A car emergency kit is not something you build once and forget forever. Water can get hot, snacks expire, batteries die, and clothing needs change by season.
A good habit is to check your kit every three months. Replace expired food, make sure flashlights still work, check batteries, and swap seasonal items as needed. For example, hand warmers may matter more in winter, while extra water matters more in summer.
This step is what turns a car emergency kit from a nice idea into something reliable.
How to Use a Home Emergency Kit Shopping List
A home emergency kit shopping list can make emergency preparedness much easier because you do not have to remember every item while you are at the store. Instead of trying to buy everything at once, you can use the list to build your home emergency kit slowly over time.
For example, you may start with water and canned food first, then add flashlights, batteries, first aid supplies, hygiene items, and copies of important documents. Using a shopping list makes the process feel more organized and less stressful.
Download the Home Emergency Kit Shopping List
To make building your home emergency kit easier, we created a printable Home Emergency Kit Shopping List that you can use when shopping and organizing your supplies. The most important part of a home emergency kit is water, food, lighting, and first aid supplies.
This checklist includes:
- First aid and medications
- Important documents and emergency information
- Hygiene and cleaning supplies
- Canned goods and food
- Light and power supplies
- Clothing, blankets, and household items
- Extra items section for your household needs
You can download and print the shopping list here and build your emergency kit step by step instead of trying to remember everything at the store.
Download the Home Emergency Kit Shopping List here.
How to Use the Home Emergency Kit Shopping List
You do not need to build a home emergency kit all at once; many families build a home emergency kit slowly over time.
When using the shopping list, do not feel like you need to buy everything at once. A better approach is to build your emergency kit slowly over time so it does not become expensive or overwhelming.
For example:
- Week 1: Buy water and a few canned goods
- Week 2: Buy flashlights, batteries, and a lantern
- Week 3: Buy first aid supplies
- Week 4: Buy hygiene and cleaning supplies
- Week 5: Buy blankets and extra clothing
- Week 6: Organize important documents
- Week 7: Review and organize everything
In a couple of months, you will have a complete home emergency kit without spending a lot of money at once.
Ready.gov also shares official recommendations for what drivers should keep in an emergency car kit.
You should also build a car emergency kit so you are prepared not only at home but also while traveling or commuting.
Final Thoughts
Learning how to build a car emergency kit is really about learning how to reduce stress before a problem happens. A good car emergency kit does not need to be huge or expensive. It just needs to be practical, organized, and matched to the way you drive.
The most important thing is to start. Build the basic kit first, then improve it over time. Add the must-have safety items, include a few comfort supplies, adjust for your family and travel habits, and check it regularly.
That is what makes a car emergency kit useful. It is not about owning more stuff. It is about being ready when something inconvenient becomes serious.
Share your comments
Car emergencies happen in different ways for different people. Some drivers worry most about a dead battery, others about being stuck in traffic with kids, and others about bad weather or road trips.
Think about your own driving habits:
- Do you spend more time commuting, traveling, or driving locally?
- What kind of roadside situation worries you the most?
- What is one item you know you should already have in your vehicle?
A car emergency kit works best when it fits your real life, not just a basic list.