As winter begins to loosen its grip and the days slowly get longer, many of us start thinking about spring. Fresh air. Green growth. A garden coming back to life. Learning how to start seeds indoors using household items is one of the easiest and most affordable ways to begin a home garden.
But you don’t need a greenhouse or expensive supplies to get started.
If you’ve ever wanted to grow your own vegetables, herbs, or flowers, starting seeds indoors is one of the simplest and most affordable ways to begin. And the best part? You likely already have everything you need at home.
Starting seeds indoors isn’t complicated. It just requires a little planning, light, and patience.
Let’s walk through it step-by-step.
Why Start Seeds Indoors?
In many areas, late winter and early spring temperatures are still too cold for seeds to survive outside. The soil may look ready, but overnight frost, cold ground temperatures, and unpredictable weather can quickly damage young plants.
Starting seeds indoors allows you to grow safely while winter is still lingering.
Instead of waiting for perfect outdoor conditions, you create a small, controlled growing environment inside your home.
Here’s why that matters:
✔ 1. Protection from Cold Weather
Seeds need warmth to germinate. In colder climates, outdoor soil often isn’t warm enough until weeks after the last frost date.
By starting indoors, you protect young seedlings from:
- Frost
- Heavy rain
- Strong winds
- Sudden temperature drops
This increases your success rate significantly.
✔ 2. Earlier Harvests
When you start seeds indoors, you give plants a head start of 4–8 weeks before planting them outside.
That means:
- Tomatoes ripen earlier
- Peppers mature faster
- Herbs become usable sooner
- Leafy greens are ready earlier in the season
Instead of waiting until mid-summer, you begin harvesting earlier and extend your growing season.
✔ 3. Stronger, Healthier Seedlings
Indoor starting allows you to control:
- Watering
- Light exposure
- Soil quality
- Temperature
This produces sturdier plants compared to direct-sowing in unpredictable outdoor conditions.
Healthy seedlings transplant more successfully and adapt better once moved outdoors.
✔ 4. Lower Cost Compared to Buying Starter Plants
Garden centers can charge several dollars per small plant.
A single seed packet often costs the same as one starter plant — but can grow dozens of plants.
Starting seeds indoors helps:
- Stretch your gardening budget
- Grow more for less
- Experiment with different varieties
For families focused on saving money, this makes a real difference.
✔ 5. Greater Variety of Plant Options
When you buy starter plants, you’re limited to what the store carries.
When you start seeds, you can choose:
- Heirloom varieties
- Rare herbs
- Unique vegetables
- Organic options
You gain more control over what you grow and how you grow it.
✔ 6. Builds Self-Sufficiency Skills
Even growing a few plants at home builds confidence.
You learn:
- Timing
- Patience
- Food production basics
- Seasonal awareness
Starting seeds indoors is often the first step toward becoming more self-sufficient.
And it can begin on a simple windowsill.
If you’re also looking for practical ways to stretch your grocery budget, you may find our guide on creating a 3-month emergency food supply helpful. https://everydayanswers.online/small-food-backup-using-plants/
Supplies You Probably Already Have
One of the biggest misconceptions about starting seeds indoors is that you need expensive trays, heating mats, and specialty tools.
You don’t.
If you look around your kitchen or recycling bin, you likely already have what you need to get started.
Repurposing household items like yogurt cups and egg cartons is one simple way to reduce waste at home. If you’re focusing on a seasonal reset, you may also want to read our spring cleaning guide for practical home refresh tips.
Let’s break it down clearly.
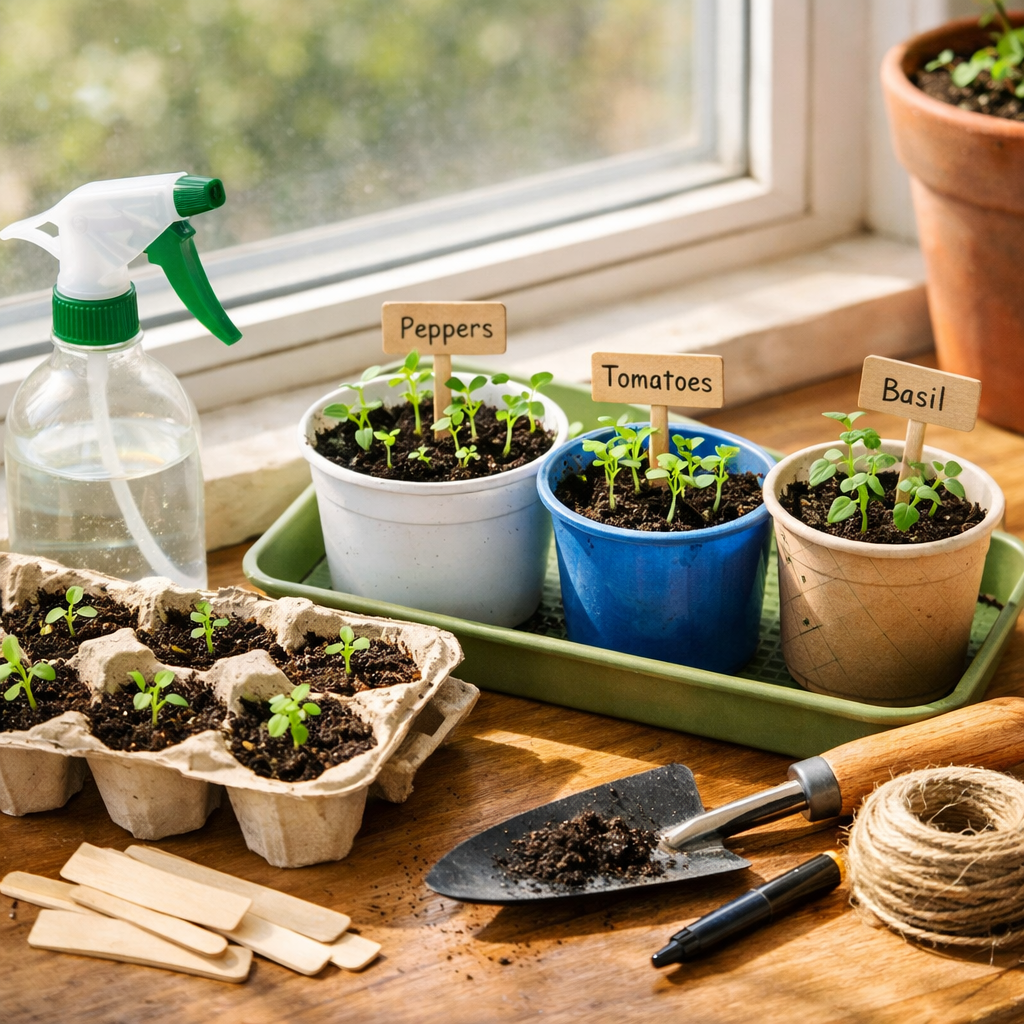
✔ Containers (Almost Anything Can Work)
Seeds don’t need fancy containers — they just need something that:
- Holds soil
- Allows drainage
- Is a few inches deep
Here are everyday items that work surprisingly well:
- Egg cartons (cardboard works best)
- Yogurt cups (poke small holes in the bottom)
- Sour cream containers
- Plastic takeout containers
- Paper cups
- Toilet paper rolls
- Muffin tins (lined with paper liners)
- Milk cartons cut in half
- Old baking pans (for grouping smaller cups)
The key is drainage. If water cannot escape, roots can rot. A simple nail, skewer, or screwdriver can create small drainage holes.
Starting simple is perfectly fine.
✔ Soil (Light and Loose Is Best)
If possible, use a seed-starting mix because it’s designed to be:
- Light
- Well-draining
- Easy for roots to grow through
If you don’t have a seed-starting mix, regular potting soil can work. Just break up any large clumps so seedlings aren’t pushing through compacted soil.
Avoid heavy garden soil from outside. It often contains pests, weed seeds, and compacts too tightly for young roots.
✔ Water (Gentle Is Better)
Young seeds are delicate.
Instead of pouring water directly from a cup, use:
- A spray bottle
- A small watering can
- A spoon for careful control
The soil should stay moist — not soaked. Think damp sponge, not muddy puddle.
Overwatering is one of the most common beginner mistakes.
✔ Light (Free and Natural)
Seedlings need light as soon as they sprout.
A bright windowsill works well, especially if it faces:
- South
- Southeast
- Southwest
If natural light is limited, affordable grow lights can help — but start with what you already have before investing in extras.
If seedlings start leaning or stretching tall and thin, they’re asking for more light.
✔ Warmth (Often Already in Your Home)
Seeds germinate best in warmth.
Most homes are warm enough, but helpful spots include:
- Near a sunny window
- On top of the refrigerator
- In a warm kitchen area
You don’t need a heating mat unless you’re growing heat-loving plants like peppers and tomatoes in very cold climates.
✔ Labels (You’ll Thank Yourself Later)
Once seedlings sprout, many plants look similar.
Use:
- Toothpicks
- Popsicle sticks
- Tape on cups
- Small pieces of cardboard
Write the plant name and planting date.
This prevents confusion later.
✔ Seeds (Choose Wisely)
Not all seeds need to be started indoors.
Good candidates include:
- Tomatoes
- Peppers
- Eggplant
- Broccoli
- Cabbage
- Herbs
Plants like carrots and radishes are usually better sown directly outside.
Always check the back of the seed packet for guidance.
The Bottom Line
Starting seeds indoors doesn’t require a trip to a specialty store.
A yogurt cup.
Some soil.
A sunny window.
That’s enough to begin.
Step-by-Step: How to Start Seeds Indoors
Starting seeds indoors is easier than it sounds. The goal is simple: give seeds warmth, moisture, and light so they can grow strong before they ever touch outdoor soil.
Set aside 30–45 minutes, gather your supplies, and let’s walk through it step-by-step.
Step 1: Choose Your Seeds and Check Timing
Before you plant anything, look at the back of your seed packet. It will tell you when to start indoors — usually something like:
“Start indoors 6–8 weeks before the last frost.”
If you’re not sure your last frost date, you can quickly look it up by your zip code.
Starting too early can lead to seedlings that outgrow their containers before outdoor temperatures are safe.
A few great seeds to start indoors include:
- Tomatoes
- Peppers
- Broccoli
- Herbs
Step 2: Prep Your Containers for Drainage
Pick your containers and make sure they can drain properly.
If you’re using yogurt cups, plastic containers, or paper cups:
- poke 3–6 small holes in the bottom
- place them on a tray or old baking pan to catch water
Drainage is important because wet soil with nowhere to go can cause:
- mold
- fungus gnats
- root rot
Simple drainage holes prevent most beginner problems.
Step 3: Add Soil the Right Way (Don’t Pack It Down)
Fill each container with seed-starting mix or light potting soil.
Leave about ½ inch of space at the top.
Then do this:
- gently tap the container to settle soil
- do NOT pack it tightly
Seedlings need loose soil so tiny roots can spread easily.
Step 4: Moisten the Soil Before Planting
Lightly dampen the soil before adding seeds.
The soil should feel like a wrung-out sponge:
- moist
- not dripping
This helps seeds stay in place and germinate more evenly.
A spray bottle works great here.
Step 5: Plant Seeds at the Correct Depth
This matters more than people think.
Use the seed packet instructions, but here’s a general rule:
Plant seeds about 2x as deep as their size.
Examples:
- Tiny seeds (like lettuce): press gently into soil surface
- Medium seeds: cover lightly with soil
- Larger seeds: plant a little deeper
After planting:
- lightly cover with soil (if needed)
- gently press the soil down just enough to hold it
Step 6: Water Gently (Avoid Washing Seeds Away)
Newly planted seeds can shift easily.
Instead of pouring water, use:
- spray bottle
- spoon drips
- gentle watering can
You want the soil evenly moist, not flooded.
Overwatering is one of the biggest reasons seedlings fail.
Step 7: Create a Warm “Germination Zone”
Most seeds germinate best in warmth.
Place your containers somewhere warm like:
- near a sunny window
- on top of the refrigerator
- near a warm area in the kitchen
Optional trick: cover containers loosely with plastic wrap or a clear lid to hold humidity (but remove it once seedlings sprout to prevent mold).
Step 8: Watch for Sprouts — Then Give Light Immediately
Once sprouts appear, light becomes the most important thing.
If using a window:
- put seedlings in the brightest window possible
- rotate the tray daily so they grow straight
If seedlings get tall and thin, they aren’t getting enough light.
This is common and easy to fix — just increase light exposure.
Step 9: Thin Seedlings So the Strongest One Wins
If multiple seedlings pop up in one container, they’ll compete for space and nutrients.
Instead of pulling them out (which can disturb roots), do this:
- snip weaker seedlings at soil level with scissors
Leave the strongest seedling to grow.
It feels tough, but it works.
Step 10: Water Consistently and Add Gentle Airflow
As seedlings grow:
- keep soil lightly moist
- avoid soaking
- water when the top feels dry
Also, airflow matters.
A small fan on low for 20–30 minutes a day helps seedlings grow stronger stems and reduces mold.
No fan? Even opening a window occasionally helps.
Step 11: Know When to “Pot Up”
If seedlings grow quickly and roots start crowding the container, it may be time to move them to a bigger cup.
Signs it’s time:
- roots showing from drainage holes
- plant looks too large for its container
- soil dries out very fast
Move it into a slightly larger container with fresh soil.
Step 12: Harden Off Before Moving Outdoors
Before you transplant seedlings outside, they need time to adjust.
This is called “hardening off,” and it takes about 7–10 days.
Start with:
- 1–2 hours outdoors in the shade
- gradually increase sunlight each day
- bring them in at night at first
This helps prevent shock when they move into the real outdoor world.
How to Care for Seedlings
Once your seeds sprout, the real work begins. The early seedling stage is delicate, but with a little attention, you can grow strong, sturdy plants ready for the outdoors.
Here’s how to care for them properly.
1. Water Carefully — Not Constantly
Seedlings need consistent moisture, but too much water is one of the most common beginner mistakes.
The soil should feel:
- Lightly moist
- Never soggy
- Never bone dry
A simple test:
Stick your finger about an inch into the soil. If it feels dry, it’s time to water.
Use:
- A spray bottle
- A gentle watering can
- Or bottom watering (placing containers in a tray of water so soil absorbs moisture from below)
Bottom watering helps roots grow downward and reduces mold.
2. Give Them Enough Light (More Than You Think)
Light is critical.
Seedlings need about:
12–16 hours of bright light per day.
If they don’t get enough light, they become:
- Tall
- Thin
- Weak
- “Leggy”
If using a windowsill:
- Choose the brightest window in your home
- Rotate containers daily
- Keep plants close to the window
If natural light is weak, a simple grow light placed a few inches above the seedlings makes a big difference.
3. Provide Gentle Airflow
Good airflow helps:
- Strengthen stems
- Prevent mold
- Reduce fungal disease
You can:
- Open windows occasionally
- Use a small fan on low for 20–30 minutes daily
This mimics outdoor conditions and helps seedlings grow stronger.
4. Thin Seedlings When Necessary
If multiple seedlings grow in one container, they will compete for nutrients and light.
Instead of pulling extras out (which disturbs roots), trim the weaker seedlings at soil level with scissors.
It may feel wasteful, but it allows the strongest plant to thrive.
5. Fertilize Lightly (When True Leaves Appear)
Once seedlings develop their first “true leaves” (the second set of leaves that appear after sprouting), they may benefit from light feeding.
Use:
- A diluted liquid fertilizer (half strength)
- Once every 1–2 weeks
Do not fertilize immediately after sprouting — seedlings are sensitive.
Less is more at this stage.
6. Repot if They Outgrow Their Containers
Seedlings grow quickly once established.
Signs they need a larger container:
- Roots growing through drainage holes
- Soil drying out very quickly
- Plant looking crowded
Move them gently into a slightly larger container with fresh soil.
Handle seedlings by their leaves — not the delicate stem.
7. Prepare Them for the Outdoors (Hardening Off)
Before planting outside permanently, seedlings need gradual exposure to outdoor conditions.
This process usually takes 7–10 days.
Start with:
- 1–2 hours outdoors in shade
- Gradually increase sunlight and time outside each day
- Protect from strong wind and heavy rain
Sudden full exposure can shock or kill young plants.
Slow transitions produce stronger results.
A Simple Reminder
Seedlings don’t need perfection.
They need:
- Consistent light
- Moderate watering
- Warmth
- Patience
Gardening teaches observation. Pay attention to what your plants are showing you.
If leaves droop, check moisture.
If stems stretch, increase light.
If growth slows, assess temperature.
Small adjustments make big differences.
When to Move Seedlings Outdoors
Moving seedlings outside too soon is one of the most common mistakes new gardeners make. Even if the weather feels warmer during the day, nighttime temperatures can still drop low enough to damage young plants.
Timing matters.
1. Wait Until After the Last Frost Date
Before transplanting outdoors, make sure your area has passed its average last frost date.
You can check this by:
- Searching your zip code + “last frost date”
- Looking at local gardening calendars
- Asking a local nursery
Tender plants like tomatoes and peppers are especially sensitive to cold. Even one unexpected frost can kill them. You can check your growing zone using the official USDA Plant Hardiness Zone Map to better understand your local climate and planting timeline. https://planthardiness.ars.usda.gov/
When in doubt, wait a little longer.
2. Check Soil Temperature — Not Just Air Temperature
The air may feel warm, but soil warms more slowly.
Most warm-season plants prefer soil temperatures above:
- 60°F (15°C) for tomatoes
- 65°F (18°C) for peppers
Cool-season crops like lettuce and broccoli tolerate cooler soil.
If soil is too cold, growth will stall or roots may struggle.
3. Harden Off Before Transplanting
Before moving seedlings permanently outdoors, they need gradual exposure to outside conditions. This process is called hardening off.
Seedlings grown indoors are not used to:
- Direct sunlight
- Wind
- Temperature swings
Start the hardening process about 7–10 days before transplanting.
Day 1–2:
Place seedlings outside in shade for 1–2 hours.
Day 3–5:
Increase time outdoors and introduce mild sunlight.
Day 6–8:
Allow longer periods in direct sun.
Final Days:
Leave them outside most of the day, bringing them in at night if temperatures drop.
This gradual exposure strengthens stems and prevents transplant shock.
4. Look for Signs They’re Ready
Seedlings are ready to move outside when they:
- Have several sets of true leaves
- Have strong, upright stems
- Are at least 3–4 inches tall (varies by plant)
- Have filled out their container without becoming root-bound
If plants look thin or weak, give them more indoor time.
5. Transplant on a Calm, Cloudy Day
If possible, transplant on:
- A cloudy day
- Or in late afternoon
This reduces stress from intense midday sun.
Water seedlings well before transplanting and again after planting them in the garden.
For the first few days outdoors, monitor them closely.
Patience Pays Off
It’s tempting to move plants outside as soon as the weather warms up. But patience during this stage often leads to stronger growth and better harvests later in the season.
Rushing this step can undo weeks of careful indoor care.
A slow, steady transition helps your seedlings thrive.
Beginner Tips for Success
Starting seeds indoors doesn’t require perfection — it requires attention and patience. If this is your first time, keep things simple and manageable.
Here are a few tips that can make a big difference:
✔ Start Small
It’s tempting to plant 10 different vegetables at once, especially when seed packets look exciting.
Instead, begin with 2–4 types of plants. This makes it easier to:
- Monitor watering
- Adjust lighting
- Learn from mistakes
- Avoid feeling overwhelmed
You can always expand next season.
✔ Don’t Start Too Early
One of the most common beginner mistakes is planting too soon.
If seedlings outgrow their containers before outdoor temperatures are ready, they become:
- Root-bound
- Stressed
- Weak
Follow the timeline on the seed packet and work backward from your last frost date.
Patience here prevents frustration later.
✔ Label Everything Clearly
Once seedlings sprout, many plants look nearly identical.
Without labels, you may forget what you planted.
Use:
- Popsicle sticks
- Tape
- Toothpicks
- Small cardboard strips
Write both the plant name and planting date.
You’ll appreciate this later.
✔ Observe Before You React
If a plant droops slightly, don’t panic.
Before making changes, ask:
- Is the soil dry?
- Is the plant reaching for light?
- Has the temperature changed?
Most seedling issues come down to:
- Too much water
- Not enough light
Small adjustments solve most problems.
✔ Accept That Some Seeds Won’t Germinate
Not every seed will sprout — and that’s normal.
Germination rates vary depending on:
- Seed age
- Storage conditions
- Plant type
Planting 2–3 seeds per container improves your chances.
Gardening always involves a little trial and error.
✔ Keep Expectations Realistic
Your first round may not look perfect — and that’s okay.
Strong stems, healthy leaves, and steady growth are the goal. They don’t need to look like garden center plants.
Every season teaches you something new.
A Final Reminder for Beginners
Seed starting is less about having the perfect setup and more about paying attention.
A sunny window.
Consistent moisture.
Patience.
That’s enough to begin.
Over time, confidence grows just like your plants.
Growing even a small amount of food at home can be part of a broader plan for stability. If preparedness is important to you, our power outage checklist offers additional ways to plan ahead.
Why This Matters
Starting seeds indoors may seem like a small step, but it represents something bigger.
In a time when grocery prices fluctuate and food quality varies, learning how to grow even a small portion of your own produce builds confidence. It reminds you that you’re not entirely dependent on store shelves.
Even a few tomato plants or a small tray of herbs can:
- Reduce grocery trips
- Stretch your food budget
- Improve the flavor of your meals
- Teach valuable seasonal awareness
Beyond the financial benefit, seed starting builds patience and observation skills. You begin to notice temperature changes, sunlight patterns, and growth cycles. You become more connected to the season rather than rushing through it.
It also gives children — and adults — a tangible lesson in responsibility. Watching something grow from a tiny seed into a thriving plant is deeply rewarding.
Once you understand how to start seeds indoors using household items, you can grow vegetables, herbs, and flowers without buying expensive gardening supplies.
You don’t need acres of land to practice self-sufficiency.
You don’t need expensive equipment.
Sometimes it begins with a windowsill and a yogurt cup.
Small skills add up over time.
And learning to start seeds indoors is one of the simplest ways to begin.
Final Thoughts
Starting seeds indoors doesn’t require a greenhouse, expensive tools, or years of experience. It simply requires a little space, a little patience, and a willingness to try.
If you’ve been thinking about growing your own vegetables, herbs, or flowers, this is a simple and affordable way to begin. You don’t have to plant an entire garden. Even a few containers on a windowsill can teach you how plants grow, how seasons shift, and how small efforts lead to real results.
Gardening isn’t about perfection. Some seeds may sprout quickly, others may take longer, and a few may not grow at all. That’s part of the learning process. What matters most is that you start.
Over time, these small skills build confidence. They remind you that you’re capable of producing something with your own hands — even in the middle of winter.
And sometimes, that’s where self-sufficiency begins.
Let’s Keep Growing Together
Starting seeds indoors looks a little different in every home.
Have you tried growing from seed before? What worked well for you — or what challenges did you run into?
If you have a favorite beginner-friendly plant or a simple seed-starting tip, share it in the comments. Your experience could help someone else get started this season.
And if there’s a specific plant you’re unsure about growing indoors, let us know. We may feature it in an upcoming guide.
Sometimes the best gardening advice comes from everyday growers learning together.